Wireless VR Headset
Jackson Okuhn and I produced a wireless VR headset leveraging existing affordable devices for our ES50 (Intro to Electrical Engineering) final project. This was a fantastic EE learning opportunity: communication via embedded devices over a variety of protocols and programming environments. It also gave me a chance to exercise Computer Vision algorithms in a real-world and realtime scenario. Below, see a quick schematic and then the republished report. Enjoy!

Authors: Nicolas Chavez, Jackson Okuhn
Course: Harvard ES 50
Instructor: Gu-Yeon Wei, Christopher Lombardo
Abstract
Our goal is to imbue Google Cardboard, which is a cheap, yet passive, VR solution, with more immersive interaction. We’d like to allow the user to interact more deeply with their VR environment via movement and rotation of their head, hand gestures, and complex button presses, none of which the device currently captures. Additionally, we propose adding a pointer device for the user instead of the current UI paradigm, which has the user keep their sight on an object for a certain period of time to select it. These UI enhancements would allow the platform to provide more immersive and dynamic experiences.
Introduction
We’d like to add head tracking and pointer tracking to Google Cardboard. The motivation is to determine how well an affordable VR solution (existing phone) will work, and if this can become a viable platform for casual gaming or even business applications (e.g. 3D modeling, architectural tours).
Design
The main idea for tracking with the Wiimote is as follows:
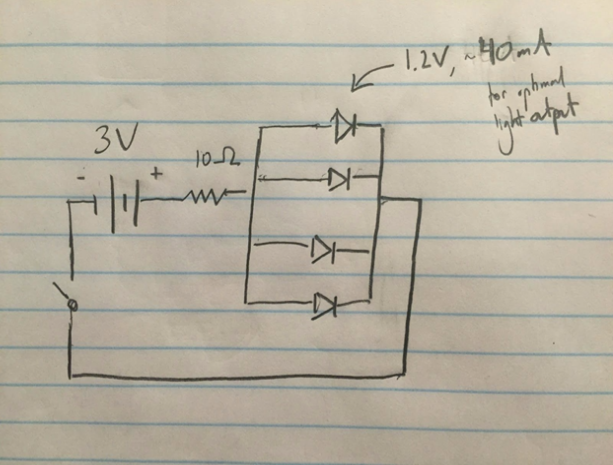
- Each Wiimote has an IR camera and can track 4 IR LED points
- If you have at least 3 non-colinear points at fixed, known distances
- Then you can track the plane’s center and normal, to orient and position the Wiimote relative to it
- (Assuming you have determined the calibration of the camera)
- Use 4 LEDs to reduce errors
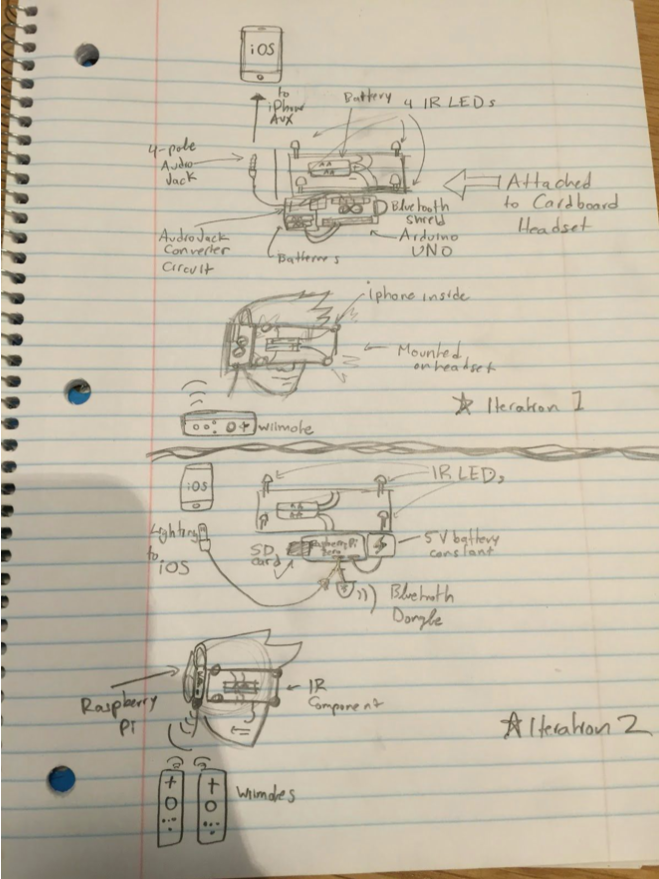
So, in this design, there are two Wiimote/LED pairs:
- One set of LEDs on the headset for the stationary Wiimote to track
- This is the inverse of what the Wiimote does, and could’ve been done the other way around too, but a Wiimote sticking out the headset is unwieldy
- Another set of stationary LEDs for the user wand Wiimote to track
Our initial plan was to connect our Wiimotes through an Arduino into the iPhone audiojack. Because the Arduino didn’t have enough onboard memory to run more than the Wiimote connection library, we had to switch it out for a Raspberry Pi Zero that we had on hand. The audio jack also turned out to be a nogo since it did not have enough throughput for our purposes and required more work to process signals correctly, so we used our iPhone’s Lightning port instead, connecting it to the Raspberry Pi via USB.
We found that 2x6 inch arrays were the perfect size for our purposes as they were small enough to fit on the cardboard headset and be read at close range by the relatively narrow Wiimote cameras, but large enough to be read as four clearly distinct coordinates, which we needed for our homographies (geometric breakdown) to work.
Parts List
| Part # | Part Name | Part ID # | Part Source | Quantity | Unit Price |
|---|---|---|---|---|---|
| 1 | Raspberry Pi Zero | SKU(925313) | Microcenter | 1 | $5.00 |
| 2 | Bluetooth USB Module Mini | WRL-09434 | Sparkfun | 1 | $10.95 |
| 3 | USB Micro-B Cable 6" | CAB-13244 | Sparkfun | 1 | $1.95 |
| 4 | USB OTG Cable - Female A to Micro A - 4" | CAB-11604 | Sparkfun | 1 | $2.95 |
| 5 | Lightning to USB Cable | None | Apple | 1 | $19.00 |
| 6 | Wii Remote Controller | ASIN(B000IMK2G) | Amazon | 2 | $17.00 |
| 7 | UC 2.0+ Cardboard VR Viewer | None | Unofficial Cardboard | 1 | $19.95 |
| 8 | Verbatim 16GB Class 10 Micro SDHC Flash Media Card with Adapter | SKU(644914) | Microcenter | 1 | $6.99 |
| 9 | LED - Infrared 950nm | COM-009349 | Sparkfun | 8 | $0.95 |
| 10 | 1500 mAh Alkaline Battery - AA | PRT-09100 | Sparkfun | 4 | $0.50 |
| 11 | Battery Holder 2xAA with Cover and Switch | PRT-09547 | Sparkfun | 2 | $1.50 |
| 12 | Breadboard - Self-Adhesive (White) | PRT-12002 | Sparkfun | 2 | $4.95 |
| 13 | Jumper Wires (10 Pack) | PRT-08431 | Sparkfun | 1 | $3.95 |
| 14 | iPhone 5+ (Owned) | $0.00 | |||
| Grand Total | $127.24 |
Project Implementation
As stated in the design section, we first tried to connect the iPhone to the Arduino via a 4pole audio jack with custom circuitry. We then aimed to connect the Wiimotes to the Arduino via a USB Host Shield with a Bluetooth dongle attached to it. We built the circuit to read and write to the iPhone on Arduino and found a library to do communication with it. We did this using Frequency Shift Keying to convert and receive our signals. Basically, our digital signals from Arduino/Wiimote needed to be converted to analog to be sent over the audio connection and then converted back to digital on the iPhone.
As also stated, this approach did not work because of the limited program memory size of the Arduino and because of the throughput limitations of the audio connection. Instead, we had a Raspberry Pi Zero lying around and used that to do the iPhone/Wiimote electronic bridge. The Wiimote could not be directly connected to the iPhone (otherwise there would be no project!) since iPhone will not make Bluetooth connections unless they are using the LE (Low Energy) standard, which the Wiimote does not use. We also did not want to connect the Raspberry Pi or Arduino to the iPhone via Bluetooth since this eats a lot of battery up, and battery is already compromised when the iPhone is doing expensive, double (once for each eye), realtime 3D rendering.
We used Raspbian, the standard Raspberry Pi OS and wrote a multithreaded Python script that would search for Wiimotes to pair with, check for a USB connection with an iPhone, and poll the Wiimotes to send data to the iPhone at 30 fps. We initially tried 60 fps, but this provoked ridiculous amounts of latency (almost 5 seconds!). The 30 fps polling instead travelled at a latency of less than 10ms, which was very acceptable. We had to devise our own “language” or “protocol” to communicate with the iPhone to represent the Wiimote data, which we tried to minimize as much as possible, using our knowledge of state machines and state representation:
WM0*A=1&B=0&D=0&IR0=1024|1024&IR1=1024|1024&IR2=-1&IR3=-1&L=0&R=1&U=0&H=1;WM1*A=1&B=0&D=0&IR0=1024|1024&IR1=1024|1024&IR2=-1&IR3=-1&L=0&R=1&U=0&H=1
In the above example message, information from two Wiimotes (WM0, WM1) is being sent. The A, B, H, U, L, D, and R tokens are flags indicating the button press state for the A, B, Home, Up, Left, Down and Right buttons. Each Wiimote can track up to 4 IR points (IR0, IR1, IR2, IR3), which can be set to -1 for not found, or in cartesian coordinates in X|Y format.
Finally, we were able to pass the Wiimote state data into Unity on iOS after writing code on iOS to breakdown the messages from the USB connection. Our work was far from over, however, as we still needed to take this data and use it! In Unity, we wrote a script to parse the data from iOS and then attempted to calculate the tracking itself. We were able to print the infrared coordinates and button press flags in Unity in a debug panel we had made to demonstrate the proof of concept.
We wrote code to take the positions of the LEDs and then figure out the affine transformation (homography) needed to transition between a reference state (0 orientation, some default position) and the current one. With this, we then had to use OpenCV on iOS to compute the decomposition of the homography we had resolved. From the decomposition we should have been able to extract the angle of the user’s head (azimuth and zenith). At this point, the decomposition is ambiguous and is constrained to 4 distinct discrete scenarios, of which only one is physically possible (others involve a negative camera or the object behind the camera).
Outlook and Possible Improvements
When we initially proposed this project, we were a bit too ambitious. Our biggest stumbling block proved to be learning the ins and outs of all the devices and libraries we strung together in order to make our project function. After many hours of work, we realized that creating an entire first person shooter (FPS) game in iOS was wildly unrealistic and also rather out of scope for an EE project; the Unity library along with the Cardboard API are very complex and difficult to manipulate. What we’ve made instead is a proof of concept for such a video game. We’ve shown that Google Cardboard can be converted into an accurate and interactive game system for $100 in hardware (which would be closer to $50 if we had the experimental foresight) plus around fifteen hundred lines of code.
We have two obvious places to extend our project. First, we could turn our proof of concept iOS app into a fully fledged game. This would require developing a better familiarity with Unity; otherwise, our project has all the parts in place to make a reliable FPS experience. Second, we could improve the accuracy of our LED array/camera setup. This could be done by replacing our Wiimotes with custom IR cameras that have wider angle lenses, then spacing out our LEDs more and giving them a greater intensity.
Acknowledgements
We’d like to thank Chris Lombardo, Will Jameson, Harnek Gulati, and the many other members of the ES50 staff who helped us out at various points in our project.